Difference between revisions of "Makerfire Armor 65 Lite"
(→Remote control configuration) |
|||
| (7 intermediate revisions by the same user not shown) | |||
| Line 15: | Line 15: | ||
== Control Instructions(Mode2) == | == Control Instructions(Mode2) == | ||
| − | [[File: | + | [[File:F17caozuoshili1.jpg | 900px]] |
<br><br> | <br><br> | ||
| − | [[File:F17caozuoshili.jpg | 900px]] | + | [[File:F17caozuoshili.jpg| 900px]] |
<br><br> | <br><br> | ||
| Line 95: | Line 95: | ||
When Changing the new battery needs binding again.<br> | When Changing the new battery needs binding again.<br> | ||
<br><br> | <br><br> | ||
| − | 2)'''Take Frsky X9D as an example | + | 2)'''Take Frsky X9D as an example '''<br> |
<br><br> | <br><br> | ||
Step1<br> | Step1<br> | ||
| − | Install the MTX9D module in Frsky X9D radio transmitter in the correct place. | + | Install the [https://shop.makerfire.com/products/mtx9d-multiprotocol-tx-module-for-frsky-x9d-x9d-plus-x12s-flysky-th9x-9xr-pro-taranis-q-x7-transmitter MTX9D module] in Frsky X9D radio transmitter in the correct place. |
<br><br> | <br><br> | ||
| Line 212: | Line 212: | ||
<br> | <br> | ||
''https://github.com/silver13/BoldClash-BWHOOP-B-03''<br> | ''https://github.com/silver13/BoldClash-BWHOOP-B-03''<br> | ||
| + | <br> | ||
| + | Instructions:<br> | ||
| + | <br> | ||
| + | ''http://edu.litebee.com/document/armor65.pdf''<br> | ||
<br><br> | <br><br> | ||
| − | |||
== NotFastEnuf/NFE_Silverware == | == NotFastEnuf/NFE_Silverware == | ||
| Line 225: | Line 228: | ||
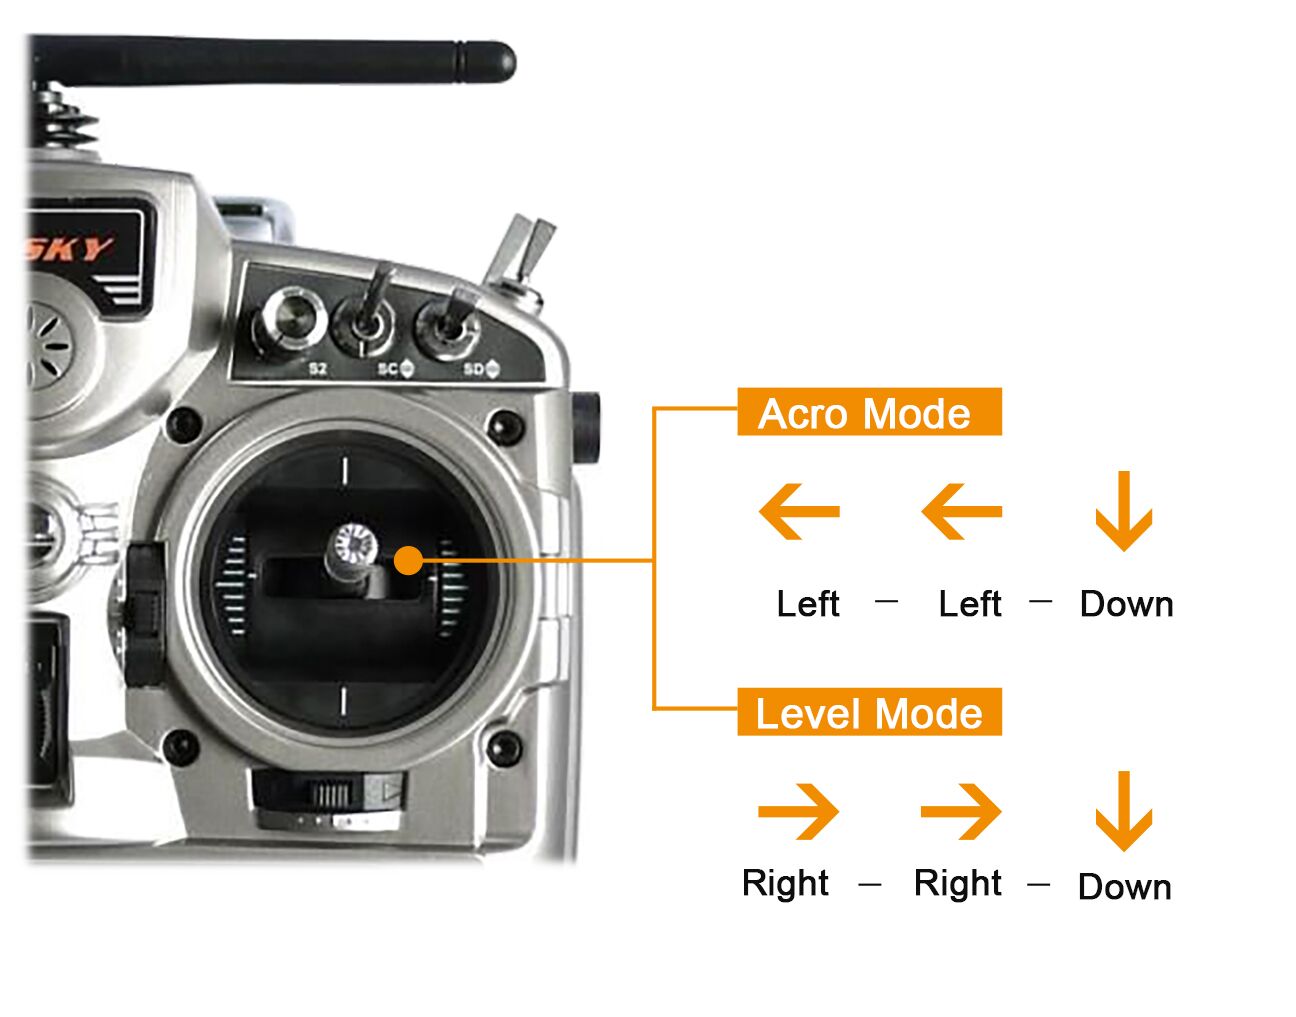
For example, the Frsky QX7 radio transmitter switches the FC's mode between level and acro by moving the right stick as show below.<br> | For example, the Frsky QX7 radio transmitter switches the FC's mode between level and acro by moving the right stick as show below.<br> | ||
<br><br> | <br><br> | ||
| − | + | == Instructions == | |
| − | + | <br> | |
| + | http://www.makerfire.cn/Armor65Lite.pdf<br> | ||
| + | <br><br> | ||
Any questions,please contact us.<br> | Any questions,please contact us.<br> | ||
Email:support@makerfire.com | Email:support@makerfire.com | ||
<br> | <br> | ||
Find us on social media:[https://www.facebook.com/pages/Makerfire/897527320310788 facebook]<br><br> | Find us on social media:[https://www.facebook.com/pages/Makerfire/897527320310788 facebook]<br><br> | ||
Latest revision as of 14:21, 23 July 2019
Contents
Specification
Wheelbase: 65mm
Flight controller: Tiny Lite Silverware FC
Remote: Tiny lite RC
Motor : 7×16mm 17600KV(65000rpm@3.7V)
Propeller: 4-Blade 31mm
VTX : 5.8G/40CH/25mW
Camera : 800TVL/120°
Battery: 300mAh /3.8V/1S/30C/Li-HV
Flight time: 4min20second
Remote Distance: 100 meters
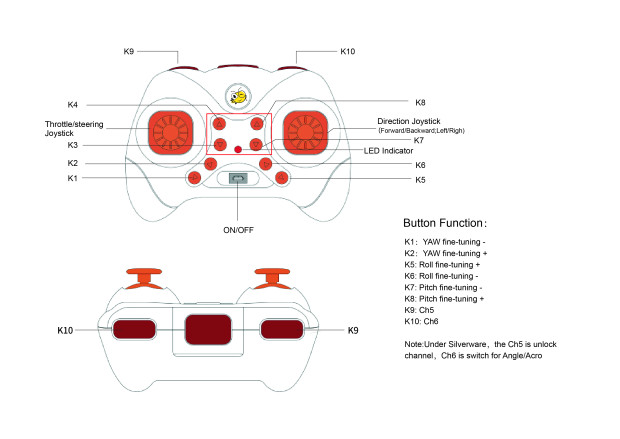
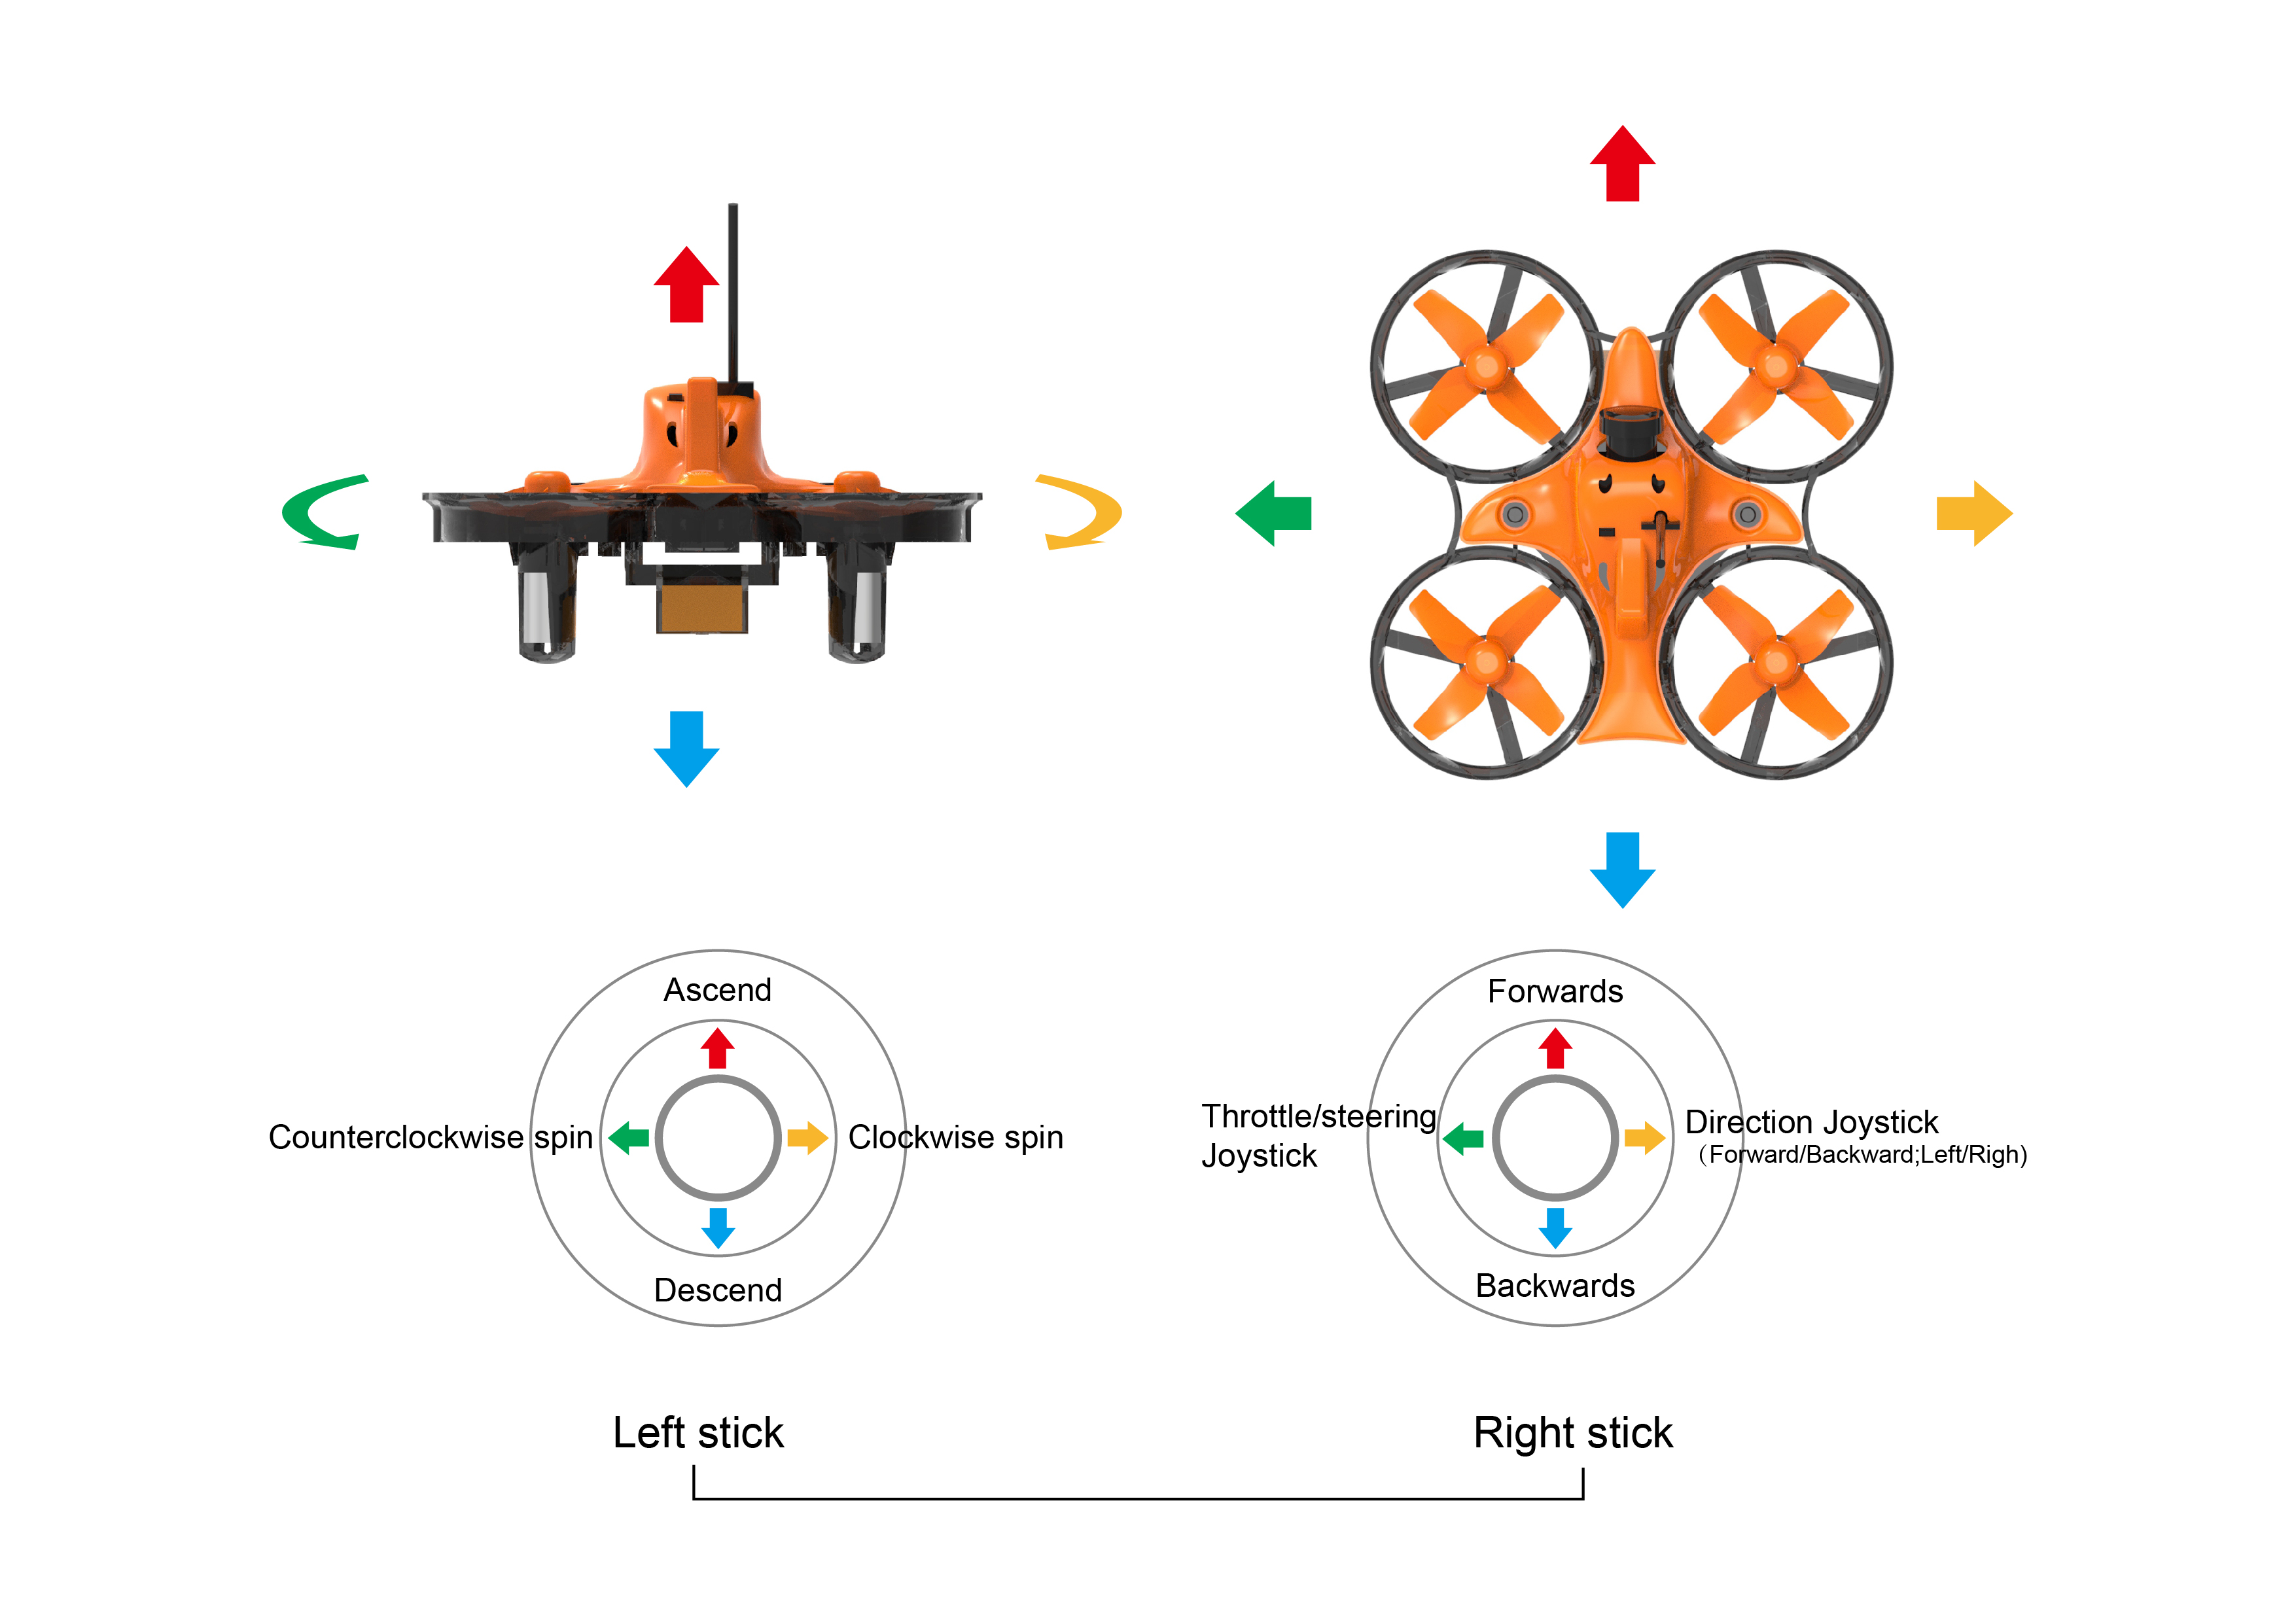
Control Instructions(Mode2)
RC Gestures Setting (Mode2)
- Left - Left - Down: acro mode
- Right - Right - Down : level mode
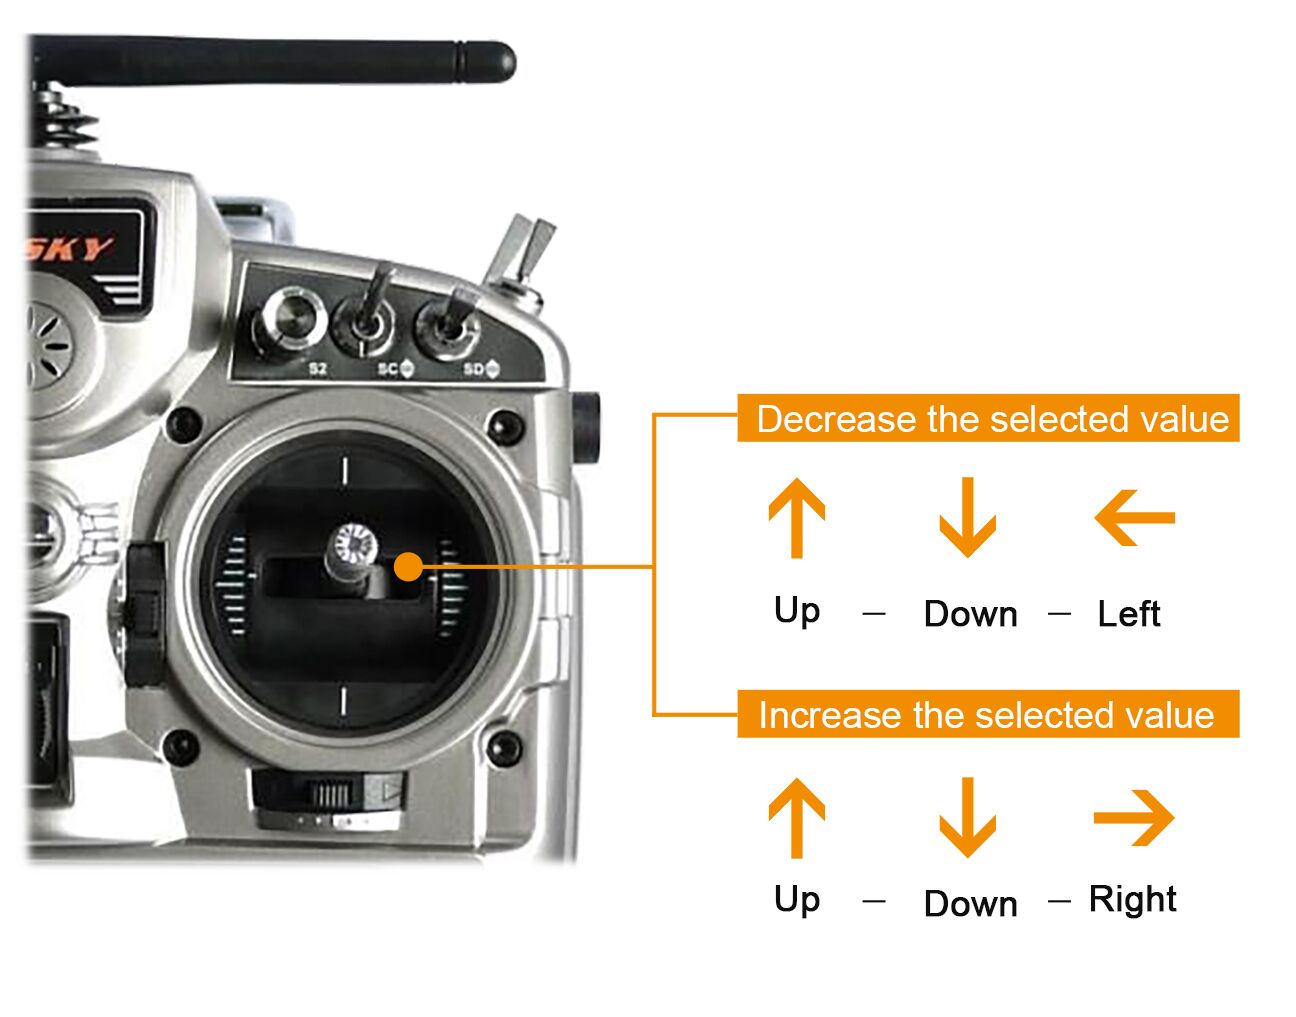
- Up - Down - Up: Cycle pid term to the next ( P - I - D )
- Up - Down - Down: Cycle pid axis to be changed ( Roll/Pitch - Yaw )
- Up - Down - Left: Decrease the selected value
- Up - Down - Right: Increase the selected value
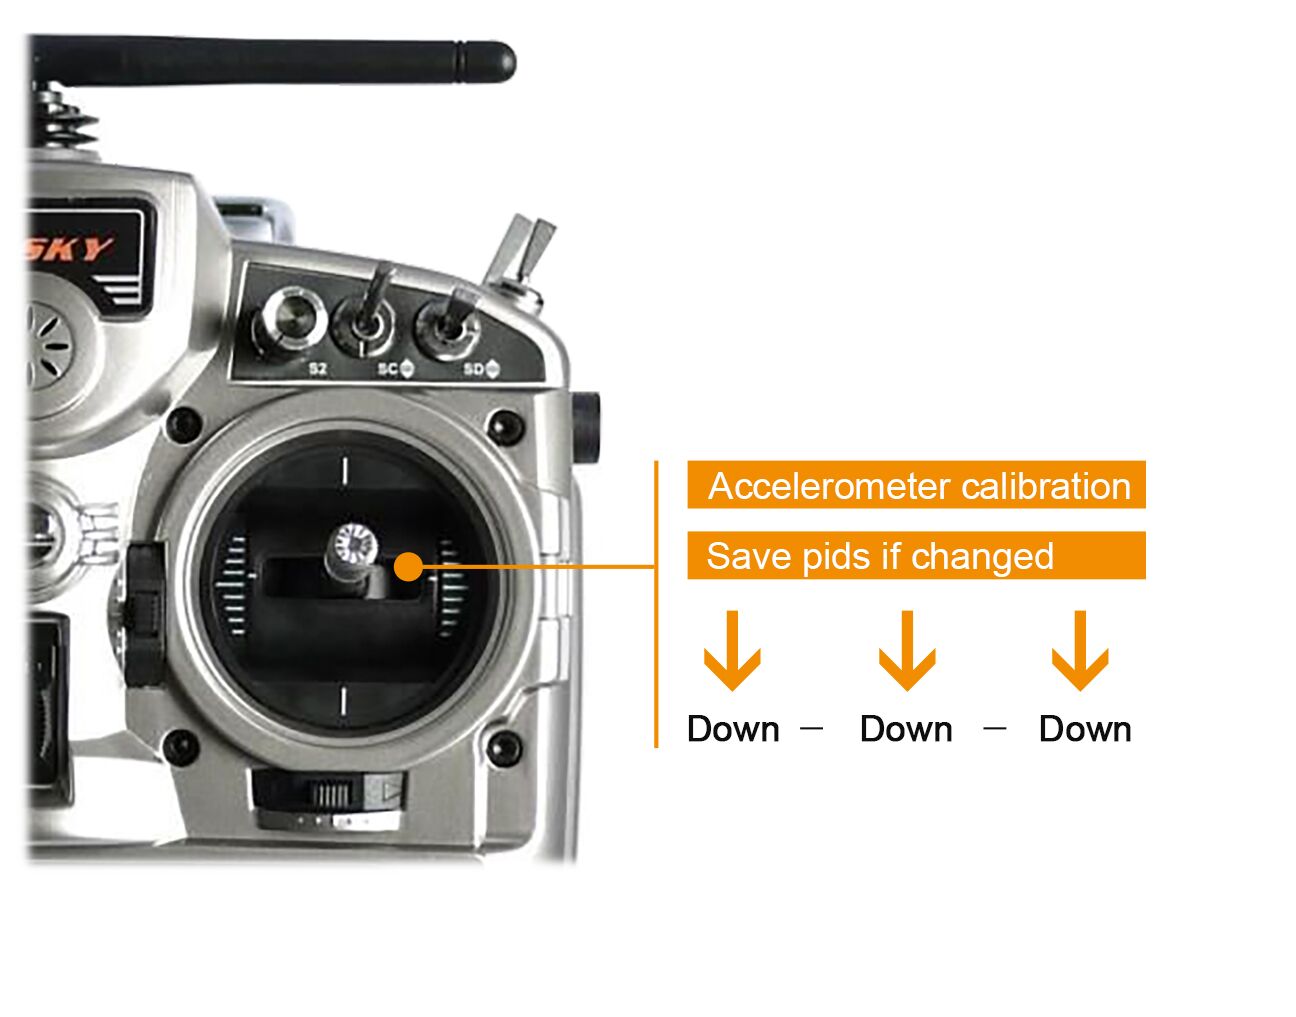
- Down - Down - Down: Accelerometer calibration / Save pids if changed
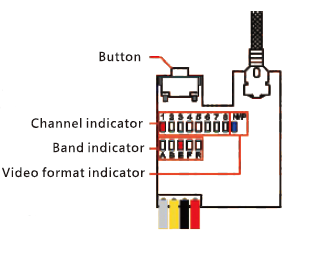
VTX Introduction:
The 25mW/40CH AIO camera in Armor65 lite is characterized by wide dynamic,
high-definition, wide angle and no delay.The light and mini AIO camera
supports button and frequency choice as well as NTSC/PAL TV system.
The LED will show video transmiter frequency,8 LEDS indicates the signal
channel, 6LEDS indicates the frequencey,the specific frequency will base
on the video trasnmitter frequency chart.
Long Press can switch over the NTSC/PAL TV system.
Short Press can switch over the vertical inverted image.
Long Press can switch the frequency of the Video transmitter.
Short Press can switch over the specific signal channel of currecnt frequency.
Finish frequency operation to configure automatically frequency point and groups. It also is equipped with non-volatile memory function.

Armor65 Lite radio transmitter
The toys like JJRC H67, Eachine E011 etc use the Bayang protocol radio transmitters.
Jumper T8SG radio transmitter
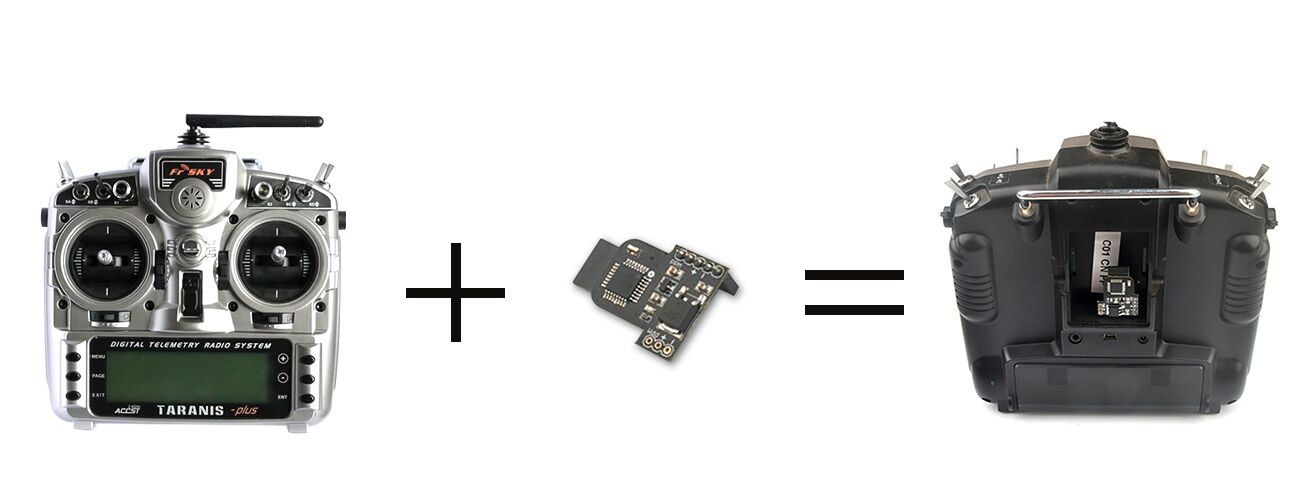
MTX-9D multiprotocol module (Suitable for Frsky Tanaris QX7 X9D X9D Plus X12S, Flysky TH9X, Turnigy 9XR/9XR PRO)
Other 4in1 multiprotocol module that support the Bayang protocol.
If not sure whether your radio transmitter could support this FC board, please email us (Support@makerfire.com) for help.
For example, if you have a Frsky Tanaris QX7 / X9D radio transmitter and want to try this FC board,
just plug in a MTX90 multiprotocol module.
Remote control configuration
1)Bayang protocol remote control configuration
Step1
Power up the Armor65 Lite, the FC indicator LED flashes slowly for 6 times and then turnes into fast flash mode. The fast flash mode shows the beginning of the binding mode.
Step2
There is the "di" sound in the buzzer when turn on the radio transmitter and then turn into the binding mode automatically.
After finishing the binding, the FC indicator LED fashes solid,and the radio transmitter has the "di" sound.
After finishing the binding, turn off the radio transmitter, the FC indicator LED turns into slowly flash mode.
Notes:
Turn on the radio transmitter before power up the Armor65 Lite, then the binding fails.
When Changing the new battery needs binding again.
2)Take Frsky X9D as an example
Step1
Install the MTX9D module in Frsky X9D radio transmitter in the correct place.
Step2
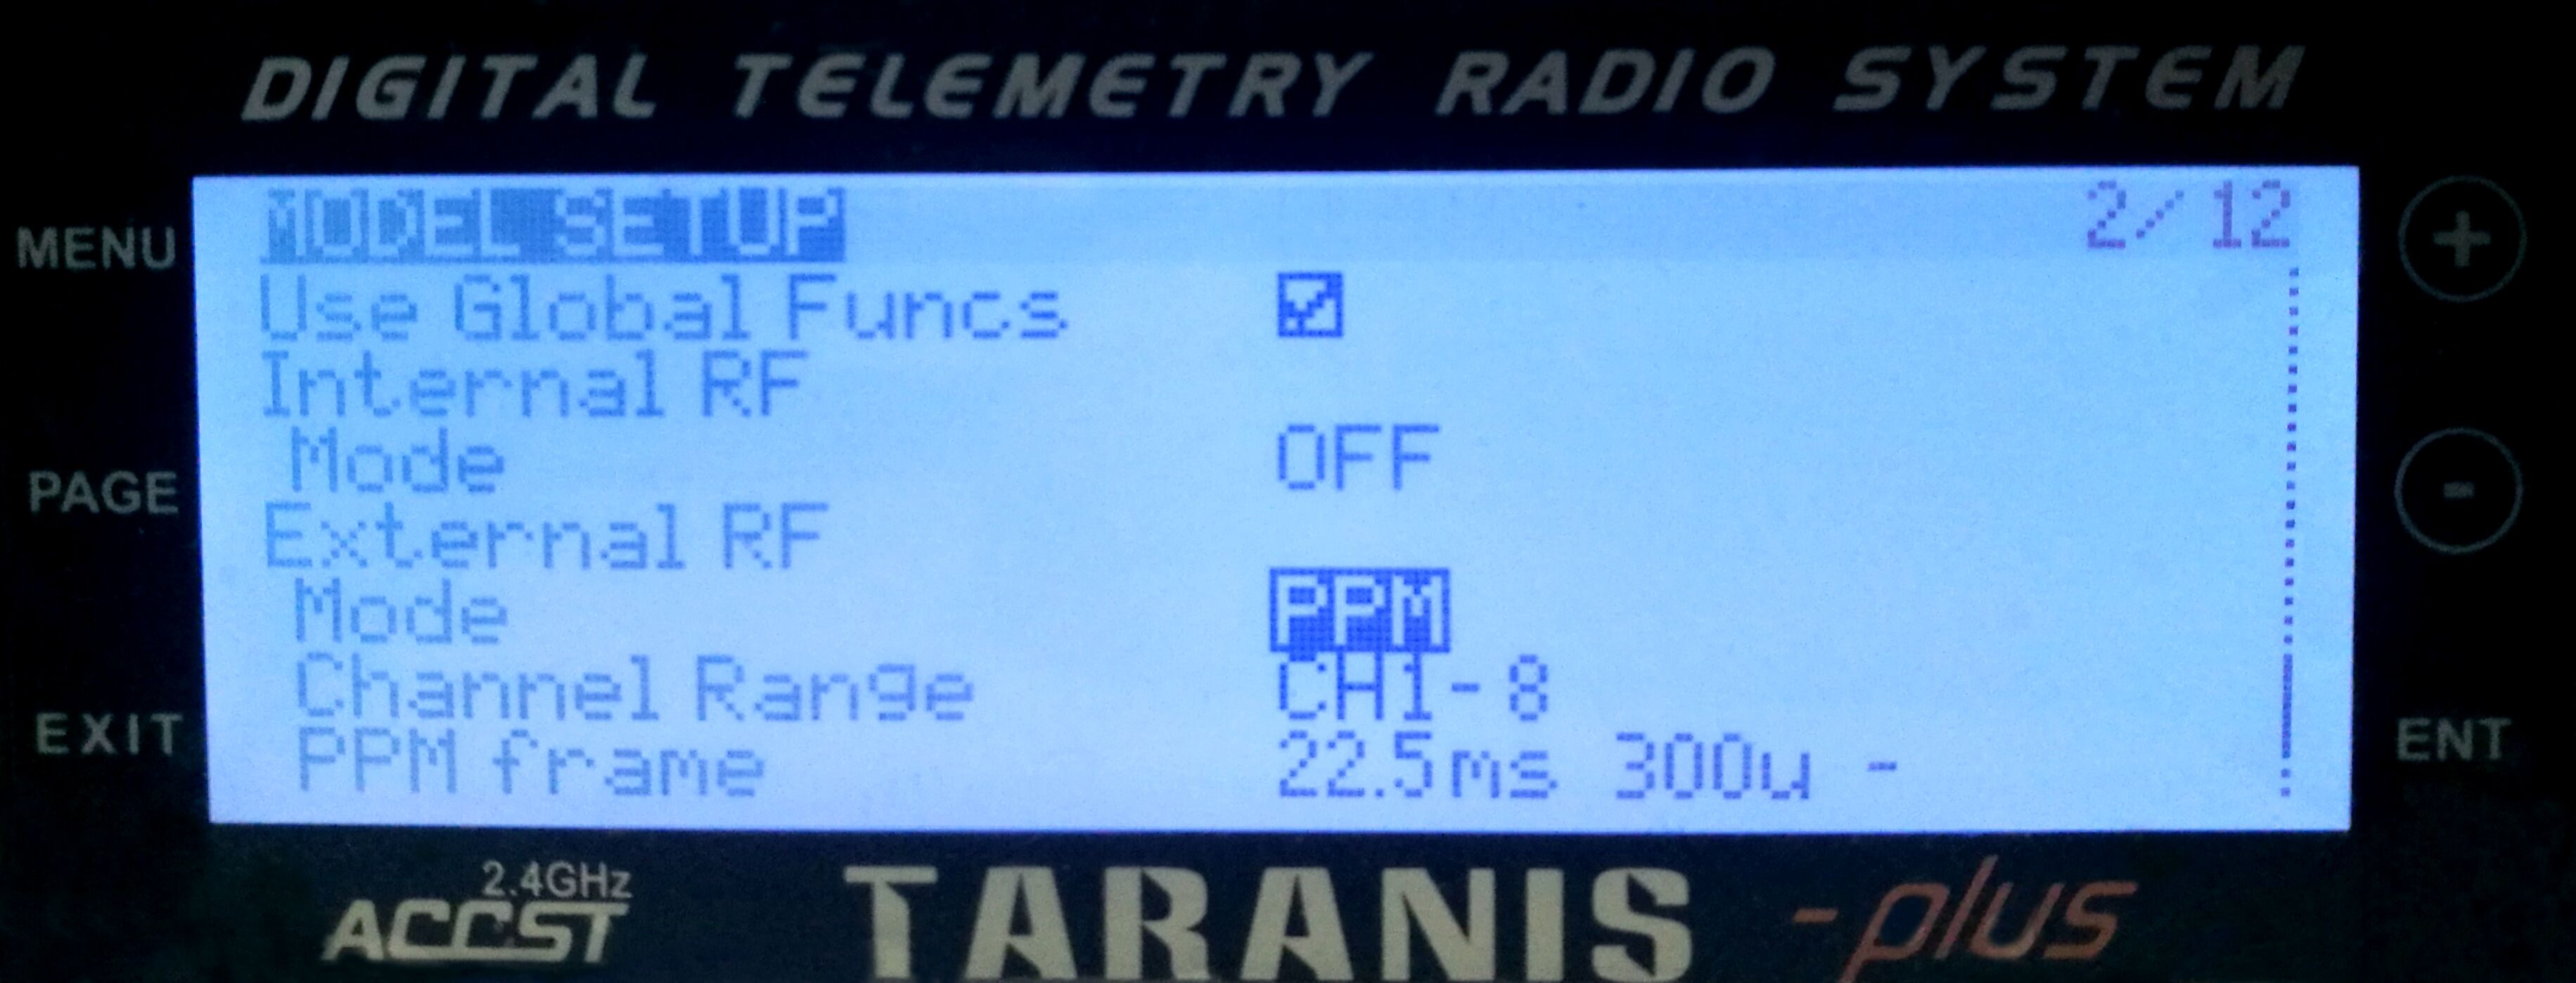
Turn on the radio transmitter,and create a radio transmitter mode.
In MODEL SETUP setting page,Set “Internal RF”to " OFF" and “External RF”to "PPM".
Step3
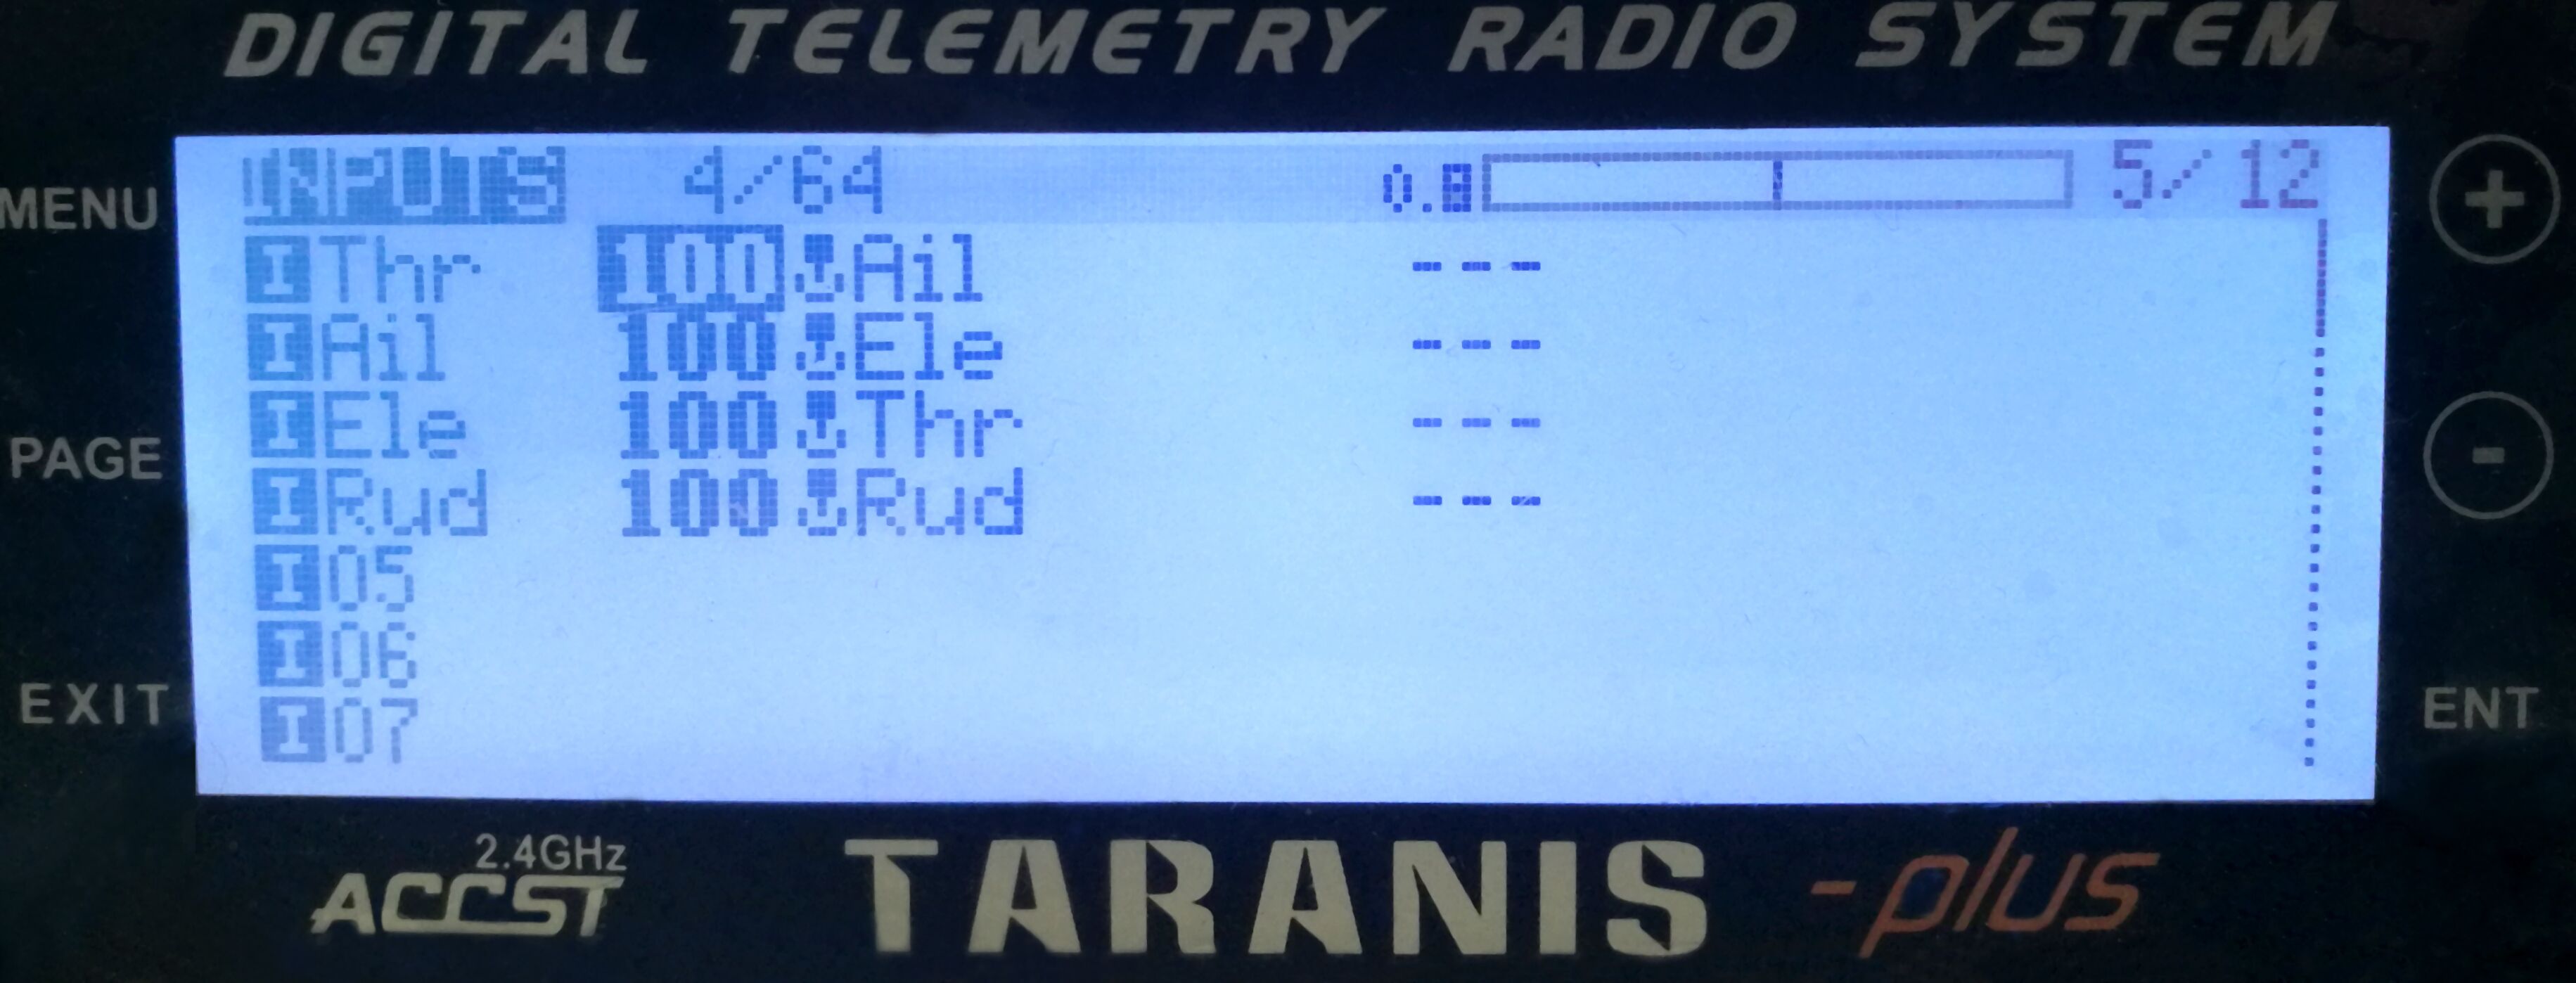
INPUTS Setting
Thr--->Ail
Ail---->Ele
Ele--->Thr
Rud--->Rud
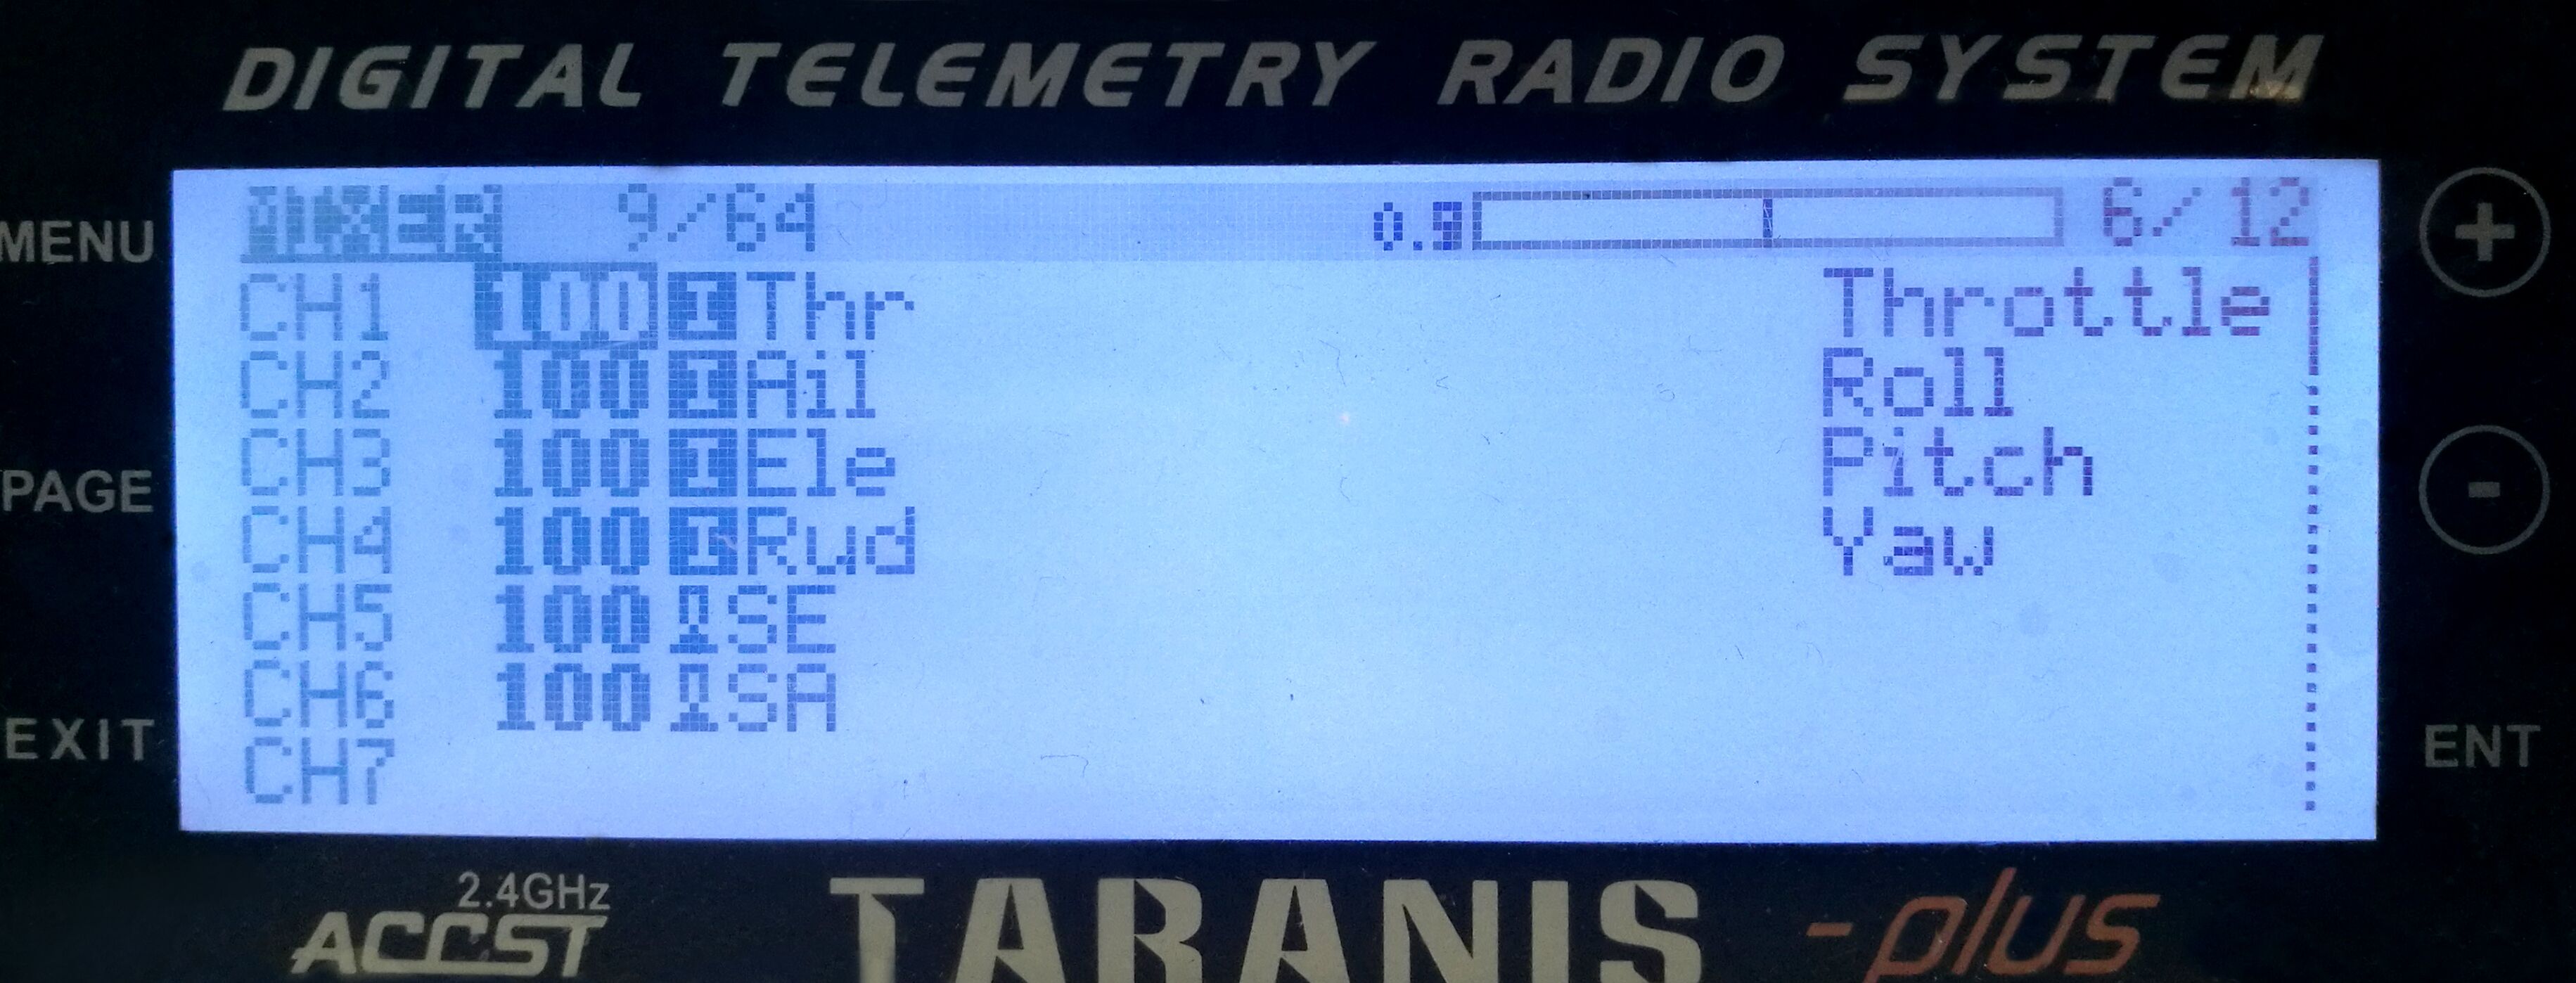
MAXER Setting
CH1-->Thr
CH2-->Ail
CH3-->Ele
CH4-->Rud
Step4
Turn off the radio transmitter.
Power up the Armor65 lite RTF and wait for the binding mode.
When the The indicator LED flashes fast,turn on the radio transmitter and push the right-Throttle to top-right direction.
The indicator LED turning the fast flash into solid shows binding is successfully.
3)T8SG remote control
Power up the Armor65 Lite, the FC indicator LED flashes slowly for 6 times and then turn into fast flash mode. The fast flash mode shows the beginning of the binding mode.
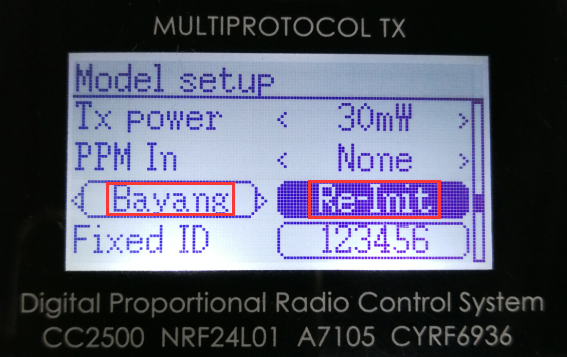
Turn on the radio transmitter, short press "ENT" and go into "“Main menu", press " ENT", go into "Model menu",choose "“Model Setup”page.
By default,the photo show below for your reference.
Adjust the cursor into "PPM In",set the receiver to "Bayang" and choose " Re-Init”.
Press "ENT" and enter the binding mode.The indicator LED turning the fast flash into solid shows binding is successfully.
The T8SG enters the binding mode automatically if setting has been finished in advance.
There is the "did" sound at the starting and finishing binding mode.
4)Other radio transmitter
CH1:AIL(ROLL)
CH2: ELE (PITCH)
CH3: THR (THROTTLE)
CH4:RUD (YAW)
CH5:ARM/DISARM(1000:DISARM,2000:ARM)
CH6:ANGLE/ACRO(1000:ANGLE,2000:ACRO)
Charging instructions
Notes:
1 . Charge the battery in time when low voltage.
2 . Turn the USB charger into 4.35v before charging.
3 . The solid red light shows the battery is in charging,light off shows in full charge.
PACKAGE
Armor65 Lite RTF (Silverware Firmware)
Package included:
1× Armor65 Lite RTF
1× Radio Transmitter
1× 300mAh 1S 3.8V Battery
1× One-way 4.35V Charger
1× Propeller Tool
4× Propellers
2× Screws
1× Service Card
3 x Sticker
How to Flash Firmware for Lite FC
The only method to restore the factory PID is reflashing the firmware for the moment.
About how to flash the firmware, please check on Silverware offical website or RCG.
https://www.rcgroups.com/forums/showthread.php?2876797-Boldclash-bwhoop-B-03-opensource-firmware
The firmware for Makerfire TinyLite FC board is available in the attached file.
If You want to compile the files by yourself, please download the files here:
https://github.com/NotFastEnuf/NFE_Silverware
https://github.com/silver13/BoldClash-BWHOOP-B-03
Instructions:
http://edu.litebee.com/document/armor65.pdf
NotFastEnuf/NFE_Silverware
Silverware is an open-source flight controller firmware developed by GitHub user silver13 for the H8 mini, BWhoop B03, and Eachine E011/E011C FCs. It was forked and further refined by GitHub user NotFastEnuf
Silverware is a firmware for some micro quadcopters, especially the whoop FPV racing.
Silverware supports level mode and acro mode. Also it can change the the settings for custom builds, or to adapt to personal preferences.
By default, Silverware changes modes, tune PIDs, calibrate accelerometer or save settings by stick sequences(also called gestures).
For example, the Frsky QX7 radio transmitter switches the FC's mode between level and acro by moving the right stick as show below.
Instructions
http://www.makerfire.cn/Armor65Lite.pdf
Any questions,please contact us.
Email:support@makerfire.com
Find us on social media:facebook
